Blog

  • Floaters & Flashes

    Eye Conditions

    Signs & Symptoms

    *  Floaters are specks, dots, cobwebs, or wavy lines that seem to fall within the line of sight. They rarely affect eyesight. They are more visible against a plain or dark background.

    *  Flashes are streaks of light that “flash” across the field of vision. They can occur when the eyes are closed or in extreme darkness.

    Causes

    With aging, the middle portion of the eye, called the vitreous, becomes less solid and more liquid. This allows particles (floaters), which have always been in the eye, to begin to move around. Flashes can occur when the vitreous shrinks and pulls on the retina of the eye. This is common. On rare occasions, when the vitreous detaches from the retina, it can rip or tear the retina. This may lead to a detached retina. The retina peels away from the eye wall causing sight loss.

    Risk Factors for Floaters and Flashes

    *  Eye diseases or injuries.

    *  A tear in the retina. Aging and cataract surgery increase the risk for this.

    *  High blood pressure.

    *  Migraine headaches.

    *  Nearsightedness.

    Treatment

    Self-care is enough to treat floaters and flashes unless they are due to another medical condition.

    Questions to Ask

    Self-Care / Prevention

    *  Move your eyes up and down (not side to side) several times.

    *  Don’t focus on or stare at plain, light backgrounds, such as a blank pastel wall or the light blue sky.

    *  You may notice flashes less if you avoid moving suddenly, don’t bend over, and don’t get up quickly from sitting or lying down.

    Healthier at Home book by the American Institute for Preventive Medicine. www.HealthyLife.com. All rights reserved.

    © American Institute for Preventive Medicine

  • Flatulence (Gas)

    Abdominal & Urinary Conditions

    Image of man plugging his nose with hand.

    Flatulence is passing gas through the anus. For the average adult, this happens about 6 to 20 times a day.

    Signs & Symptoms

    *  Pressure or discomfort in the lower abdomen or anal area.

    *  Passing gas. A foul odor occurs sometimes.

    Causes

    Gas is caused by swallowing air and digesting foods. Eating high fiber foods like beans, peas, and whole-grains create more gas than other foods. Dairy foods can create large amounts of gas in some people.

    Gas may signal other problems, too. These include lactose intolerance, taking certain antibiotics, and abnormal muscle movement in the colon.

    Gas can also be a symptom of celiac disease. With this, the lining of the small intestine is damaged from eating gluten. This is a protein in wheat, barley, and rye. Other symptoms of celiac disease are pain and bloating in the abdomen; diarrhea; weight loss; anemia; and a certain skin rash. Treatment is a gluten-free diet. Find out about celiac disease fromwww.celiac.nih.gov.

    Treatment

    Self-care treats most cases of gas. If the gas is due to another problem, treating the problem reduces or gets rid of the gas.

    Questions to Ask

    Self-Care / Prevention

    *  Try not to swallow air. Don’t have carbonated drinks and chewing gum. These can cause more air to get into your stomach.

    *  When you add fiber to your diet, do so gradually.

    *  When you pass gas, note which foods you have eaten. Eat less of the foods that often cause gas. Common ones are apples, bran, whole-wheat foods, cabbage-family vegetables, eggs, dairy products, prunes, and beans.

    *  To prevent getting gas from many “gassy” foods, try an over-the-counter product, such as Beano. This helps prevent gas from beans, bran, nuts, onions, soy, and many vegetables.

    *  Try an over-the-counter medicine with simethicone, such as Gas-X.

    *  Release the gas when you need to. Go to another room if it will help you be less embarrassed.

    Healthier at Home book by the American Institute for Preventive Medicine. www.HealthyLife.com. All rights reserved.

    © American Institute for Preventive Medicine

  • Fishhook Removal

    First Aid

    A fishhook can nick or cut the skin, get stuck in the skin near its surface, or get deeply embedded in the skin. First aid treats most fishhook accidents.

    Questions to Ask

    Self-Care / First Aid

    For a Fishhook Deeply Embedded in the Skin

    *  Put ice or cold water on the wound area to numb it. Push on the shaft of the hook until the barb protrudes. See image A. With wire cutters, snip the hook at either the shank or the barb. See image B. Pull the hook out. See image C.

    *  Wash the wound area well with soap and water. Treat for a puncture wound.

    For a Fishhook Stuck Near the Surface of the Skin

    *  Put ice or cold water on the wound area.

    *  Take a piece of fishing line. Loop one end and tie it to the hook near the surface of the skin. See image D. Grasp the shaft end of the hook with one hand and press down about 1/8th inch to disengage the barb. See image E.

    *  Keep pressing the hook down and jerk the fishing line in a motion parallel to the skin’s surface to make the shaft of the hook lead the barb out of the skin. See image F. Treat for a puncture wound.

    {Note: For nicks or surface cuts to the skin, treat for a cut.

    Healthier at Home book by the American Institute for Preventive Medicine. www.HealthyLife.com. All rights reserved.

    © American Institute for Preventive Medicine

  • First Aid Precautions

    First Aid

    Image of women on phone beside someone who is unresponsive.

    First Aid Safety Steps

    1.  LOOK around. Is it safe to help? If not, call  9-1-1, have someone else call, or seek medical help. If it is safe to help, stay calm and go to step 2.

    2.  CHECK for a response.

    *  Gently tap the person. Ask, “Are you okay?” Ask loudly. Call the person by name if you know it.

    *  If the person responds or moves, attend to his or her problem, as needed. If the person is injured or the problem is serious, call for emergency medical care. Give first aid as needed, until medical help arrives.

    *  If the person does not respond or move, begin CPR.

    3.  PROTECT yourself from hepatitis B virus and HIV, the virus that causes AIDS. You can get these from an infected person’s blood or other body fluids if they enter your body. These organisms can enter through cuts or breaks in your skin or through the lining of your mouth, nose, and eyes. When you give first aid or do CPR, take these steps, especially if you don’t know the person:

    *  Use plastic wrap or a plastic bag that you can throw away whenever you touch another person’s body fluids, blood, or other objects that may be soiled with his or her blood. If possible, have the person apply pressure to the wound with his or her own hand.

    *  Cover the person’s open wounds with dressings, extra gauze, or waterproof material.

    *  Using a mouth-to-mouth barrier device when you give rescue breaths may or may not protect you from picking up an infection. You do not need to give rescue breaths with Hands-Only CPR.

    *  Within 1 to 2 hours, report every incident that exposes you to another person’s blood or other body fluids to your doctor and EMS personnel.

    4.  FIND out if the person has certain medical needs.

    *  Ask if he or she has prescribed medicine, such as nitroglycerin, to take for a heart condition. Ask where he or she keeps the medicine. Find out how much to give. Ask the person or read the directions on the medicine’s label, if there is one.

    *  Ask the person if you can give the medicine to him or her.

    *  Look for a medical alert tag to find out about health problems the person has.

    *  Find out if the person is allergic to any medicine.

    Healthier at Home book by the American Institute for Preventive Medicine. www.HealthyLife.com. All rights reserved.

    © American Institute for Preventive Medicine

  • First Aid For Choking

    First Aid

    The Heimlich maneuver can be used to clear an object blocking the airway in conscious adults and children ages 1 to 8. It lifts the diaphragm and forces air from the lungs to push the object that blocks the airway up and out.

    Persons Over 8 Years Old

    1. Ask, “Are you choking?”

    The person may use the choking sign. Do not interfere if he or she can speak, cough, or breathe.

    2. If not able to speak, cough, or breathe, reach around the person’s waist from behind.

    Make a fist. Place it above the navel, but below the rib cage. Grasp your fist with your other hand. Press your fist into person’s abdomen and give 5 quick, upward thrusts. See image A.

    Image of giving a person first aid for choking.

    Image A

    3. Repeat upward thrusts until the object is forced out or the person becomes unconscious.

    If the object is removed with success, the person should see a doctor as soon as possible.

    4. If the person becomes unconscious, shout for help! Call 9-1-1!

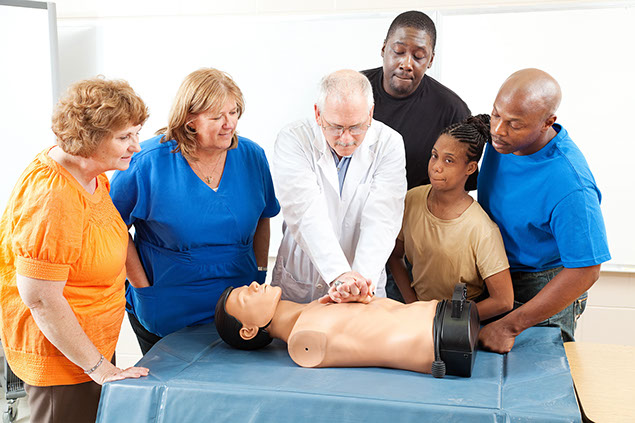
    Tilt the head back and lift the chin to open and check the airway. {Note: If you suspect the person has a head, neck, or spine injury, do not move him or her. Pull the lower jaw forward to open the airway.} Give 2 slow rescue breaths. If this doesn’t help, tilt the head further back (if no head, neck, or spine injury). Give 2 rescue breaths again. If the person does not respond or move, give 30 chest compressions. See image B. Repeat rescue breaths and chest compressions. Each time you open the airway to give rescue breaths, check the person’s mouth for the object and remove it if you can. Do CPR as needed, until the object blocking the airway is forced out or until medical help takes over.

    Image of adult chest compressions.

    Image B

    5. Even when the object is removed with success, the person should see a doctor as soon as possible.

    Children Ages 1 to 8

    1.  For a conscious child, give abdominal thrusts as for adults. Don’t be too forceful.

    2.  For an unconscious child, give first aid for choking as for an adult.

    Babies Up to 1 Year Old

    1.  Do not interfere if the baby coughs strongly, cries, or breathes okay.

    2.  If the baby is conscious, hold the baby’s head (face down) in one hand. Straddle the baby over your forearm. Rest your forearm on your leg for support. Keep the baby’s head lower than the rest of his or her body.

    3.  With the heel of your free hand, give up to 5 quick, forceful blows on the baby’s back between the shoulder blades. See image C. If the object still blocks the airway, go to step 4.

    4.  Turn the baby over (face up). Cradle the baby on your forearm. Support the head with one hand. Keep the baby’s head lower than the rest of his or her body. Rest your arm on your leg for support. Place 2 fingers 1/2 inch below and in between the nipples on the baby’s chest. Give 5 quick downward thrusts. Depress the sternum about 1-1/2 inches with each thrust.

    5.  Repeat steps 3 and 4 until the object is removed or the baby is unconscious.

    6.  If the baby is unconscious, shout for help. Have someone call 9-1-1! If no one calls 9-1-1, give first aid for 1 minute, stop to call 9-1-1, then resume rescue efforts.

    7.  Put the baby on his/her back. Keep the head tilted back with one hand and give 30 chest compressions using 2 fingers on your other hand. Give 2 slow rescue breaths. If the object is expelled, stop. If not, give cycles of 30 compressions and 2 slow rescue breaths until the object is removed or help arrives.

    8.  Check for and remove the object in the airway, if visible. Repeat steps 7 and 8 as needed.

    9.  Don’t give up! Give CPR until medical help takes over or until the object is removed. Even if it is, get medical care right away.

    Illustration on giving a baby first aid when choking.

    Image C

    Healthier at Home book by the American Institute for Preventive Medicine. www.HealthyLife.com. All rights reserved.

    © American Institute for Preventive Medicine

  • First Aid Checklist

    First Aid

    Keep basic tools handy for those little emergencies.

    Mom’s kisses are great, but some boo-boos need a little more care to keep infections away. A well-stocked first-aid kit may be all you need for life’s little emergencies. Keep one at home, but out of the reach of children. Store a second one in the car. And if you hike, camp, or bike, take a kit with you.

    First-aid kit items:

    The first-aid kit should have a first-aid guide that includes step-by-step instructions for each item.

    *  Acetaminophen, aspirin, or ibuprofen

    *  Adhesive bandages of different sizes. Sterile gauze pads, a roll of gauze, and tape.

    *  Antibiotic ointment or spray. Antiseptic ointment or wipes.

    *  Antihistamine tablets or syrup

    *  Calibrated medicine spoon and dropper

    *  Cold pack

    *  Cotton-tipped swabs

    *  Elastic wrap and closures

    *  Flashlight and extra batteries

    *  Hydrocortisone ointment

    *  Scissors

    *  Sunscreen (SPF 15 or higher)

    *  Tweezers

    Extra items for a car or boat:

    *  Clean, folded sheet and blanket

    *  Large flashlight. Extra batteries. Rope. Flares.

    *  Protective clothing and footwear

    *  Plastic bottle of water, tightly capped

    Learn how to handle common injuries & wounds:

    *  Rinse cuts and scrapes with cool water.

    *  To stop bleeding, apply firm but gentle pressure, using gauze. If blood soaks through it, add more gauze, keeping the first layer in place. Keep applying pressure until the bleeding stops.

    *  Do the Heimlich maneuver for people who are choking.

    *  Know CPR basics to help someone who collapsed due to cardiac arrest.

    Action Step

    Take a basic first-aid course for hands-on practice in giving first aid and CPR. Check with your local Red Cross, police and/or fire department to find locations and dates.

    Ways to Well-Being book by the American Institute for Preventive Medicine. www.HealthyLife.com. All rights reserved.

    © American Institute for Preventive Medicine

  • Fire & Burn Awareness

    First Aid

    Dental hygiene products, tooth brush, tooth paste, mouth wash, etc.

    Fires & burns are a leading cause of unintended home injuries & related deaths.

    Every home should have at least one fire extinguisher mounted securely and in plain sight.

    Install smoke detectors. If you use space heaters, keep them 3 feet away from items that can catch fire. Never smoke in bed.

    Loose-fitting clothing can easily catch on fire if it gets too close to burning candles or hot burners.

    If your clothes catch on fire, don’t run. Motion fans the flames. STOP where you are. DROP to the ground. ROLL back and forth, again and again, until the flames go out.

    To use a fire extinguisher, think of the acronym PASS:

    Pull the pin. Aim the nozzle or barrel at the base of the fire, not at the flames. Squeeze the handle. Sweep back and forth at the base of the fire.

    Health at Home Lifetime book by the American Institute for Preventive Medicine. www.HealthyLife.com. All rights reserved.

    © American Institute for Preventive Medicine

  • What Your Fingernails Reveal About Your Health

    Skin Conditions

    Image of fingernails.

    You may see your hands hundreds of times a day, but do you ever examine them? Probably not. Yet taking a closer look – especially at our fingernails – may not be a bad idea. They’re a good indicator of overall health.

    Spoon-shaped nails, for example, may simply be an inherited trait – or they can be a clue to a thyroid deficiency or iron deficiency anemia. Nails that have no “moon” or white crescent at the base and are thin and brittle might indicate an underactive thyroid. Still other changes – like brittleness or pitting – may be signs of other nutritional deficiencies or injury to the nail bed. While no one can diagnose a health problem on the basis of nail irregularities only, the table on next page may tip you off to possible health problems. (Consult your doctor if you see any significant changes in your nails.)

    Barring any medical explanation for nail problems, the following tips can help your nails look healthier and more attractive.

    *  Eat a well-balanced diet that includes plenty of fresh fruits and vegetables, whole grains, lean meats, and low-fat dairy products.

    *  Wear gloves when you do household chores or hobbies to avoid contact with detergents or harsh chemicals that can dry or damage nails.

    *  Clean nails with a nail brush, especially if you garden or work with messy materials. Clip cuticles and rough skin to prevent tears. File nails in one direction only. Use an emery board, not a metal nail file.

    *  Don’t use your nails as tools, such as to remove staples. If you polish your nails, use polish remover sparingly.

    Nail Symptoms and What They Could Mean

    Brittleness: Frequent immersion in hot water; generally poor health; impaired circulation; possible deficiency of vitamins A, C, B6, or niacin, deficiency of calcium or iron; thyroid deficiency

    Clubbing: Chronic lung disease or lung cancer; congenital heart disease; congenital or hereditary defect

    Pitting (may be normal): Eczema; psoriasis; trauma

    Ridges: Emphysema; heredity; kidney failure; old age; rheumatoid arthritis, traumas

    Separation (when nail plate lifts off nail bed): Allergy to nail lacquer and hardeners; fungal infection; iron deficiency anemia; pregnancy; psoriasis; trauma

    Splitting at top edge: Immersion in water for long periods, nail polish removers

    Spoon shaped: Thyroid deficiency; iron deficiency anemia

    A Year of Health Hints book by the American Institute for Preventive Medicine. www.HealthyLife.com. All rights reserved.

    © American Institute for Preventive Medicine

  • Fibromyalgia

    Bone & Muscle Problems

    Fibromyalgia is a chronic, arthritis-like illness. It affects the muscles, not the joints.

    Signs & Symptoms

    *  Chronic widespread pain on both sides of the body. This lasts for at least 3 months. It is not due to any other problem. Muscle pain can be severe.

    *  Pain in 11 or more of 22 “tender points.” (These are shown at right.)

    *  Fatigue. Disturbed sleep. Anxiety. Depression.

    These symptoms are also linked to fibromyalgia:

    *  Memory lapses. Problems concentrating. Feeling confused.

    *  Chronic headaches. Jaw pain. A tingling feeling in the limbs.

    *  Irritable bowel. Swelling and pain in the abdomen. Gas. Constipation. Diarrhea.

    Causes

    The exact cause is not known. Factors thought to play a role include:

    *  An illness caused by an infection. Emotional or physical trauma.

    *  Hormones. Women are affected more often than men.

    *  Brain chemicals and muscles don’t function like they should.

    Treatment

    *  Exercise therapy.

    *  Medication to treat symptoms.

    *  Massage therapy.

    Questions to Ask

    Self-Care / Prevention

    *  Follow the treatment plan advised by your doctor.

    *  Use biofeedback.

    *  Use relaxation techniques. Meditate.

    *  Take warm baths.

    *  Use a heating pad.

    *  Massage sore muscles.

    Resources

    National Institute of Arthritis and Musculoskeletal and Skin Diseases (NIAMS)

    www.niams.nih.gov

    Healthier at Home book by the American Institute for Preventive Medicine. www.HealthyLife.com. All rights reserved.

    © American Institute for Preventive Medicine

  • Fibroids

    Women’s Health

    Fibroids are benign (not cancerous) tumors made mostly of muscle tissue. They are found in the wall of the uterus and sometimes on the cervix. They can range in size from as small as a pea to more than 6 inches wide. With larger fibroids, a woman’s uterus can grow to the size of a pregnancy more than 20 weeks along. About 20% to 25% of women over the age of 35 get fibroids.

    Signs & Symptoms

    Some women with uterine fibroids do not have any symptoms. When symptoms occur, they vary due to the number, size, and locations of the fibroid(s). Symptoms include:

    *  Abdominal swelling, especially if they are large.

    *  Heavy menstrual bleeding, bleeding between periods or after intercourse, or bleeding after menopause.

    *  Backache, pain during sex, pain with periods, etc.

    *  Anemia from excessive bleeding.

    *  Pelvic pressure.

    *  Passing urine often from pressure on the bladder.

    *  Chronic constipation from pressure on the rectum.

    *  Infertility. The fallopian tubes may be blocked or the uterus may be distorted.

    *  Miscarriage. If the fibroid is inside the uterus, the placenta may not implant the way it should.

    Diagnosis

    Fibroids are diagnosed with a medical history and a pelvic exam. Your doctor can also do other tests, such as an ultrasound and hysteroscopy to confirm their presence, location, and size.

    Causes & Risk Factors

    Reasons a Woman is More Likely To Get Fibroids

    *  She has not been pregnant.

    *  She has a close relative who also had or has fibroids.

    *  She is African American. The risk is three to five times higher than it is for Caucasian women.

    The exact cause is not known, but fibroids need estrogen to grow. They may shrink or go away after menopause.

    Treatment

    “Watchful waiting”

    Your doctor will “watch” for any changes and may suggest “waiting” for menopause, since fibroids often shrink or disappear after that time. If you have problems during this “waiting” period, you may decide that you do not want to “wait” for menopause, but choose to have something done to treat your fibroids. Problems include: Too much pain; too much bleeding; an abdomen that gets too big; the need to take daily iron to prevent anemia; and other abdominal problems.

    Medication

    One type is called GnRH agonists. These block the production of estrogen by the ovaries. This shrinks fibroids in some cases, but is not a cure. The fibroids return when the medicine is stopped. Shrinking the fibroids might allow a minor surgery (with less blood loss) to be done instead of a major one. GnRH agonists are taken for a few months, but not more than six, because their side effects mimic menopause and may lead to osteoporosis. In some cases, GnRH agonists can be used longer with “Add Back Therapy.” This uses low dose estrogen to make side effects milder.

    Surgery Methods Include:

    *  Myomectomy. The fibroids are removed. The uterus is not. This can be done using a laparoscope and a laser (laparoscopy). The fibroids could also be cut out using a resectoscope (hysteroscopy). Fibroids can be removed under direct vision during abdominal surgery (laparotomy). Myomectomy methods may allow fibroids to grow back. The more fibroids there are to begin with, the greater the chance they will grow back.

    *  Procedures to destroy the uterine lining. These do not remove fibroids or the uterus, but stop or lighten menstrual flow from then on. The uterine lining can be destroyed using a laser, heat, or ultra cold.

    *  Uterine artery embolization. A catheter is inserted in a large blood vessel in the groin and sent to the level of the uterine arteries. A substance is given that blocks blood flow to the uterine arteries that nourish the fibroids. This treatment shrinks the fibroids.

    *  Hysterectomy. This surgery removes the uterus and the fibroids with it. This method is advised when the fibroid is very large or when other treatments don’t stop severe bleeding. It is the only way to get rid of fibroids for sure. A women can no longer get pregnant after the surgery. This treatment is also advised if the fibroid is cancerous. This rarely occurs.

    Questions to Ask

    Self-Care / Prevention

    *  Take medications as advised.

    *  Maintain a healthy body weight. Follow a diet low in fat. The more body fat you have, the more estrogen your body is likely to have. This promotes fibroid growth.

    *  Do regular exercise. This may reduce your body’s fat and estrogen levels.

    Resources

    National Women’s Health Information Center

    www.womenshealth.gov

    Women's Self-Care book by the American Institute for Preventive Medicine. www.HealthyLife.com. All rights reserved.

    © American Institute for Preventive Medicine