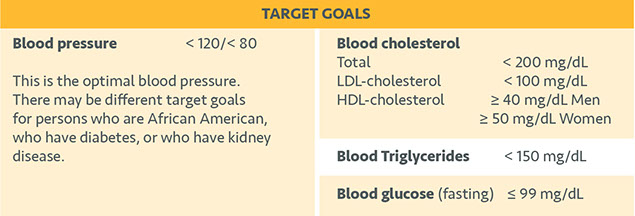
Tag: Health Conditions

  • A Beautiful Brain

    Brain & Nervous System

    A pink paper brain with 2 dumb bells next to it.

    Like a great conductor, our brain directs our every movement, sound, and emotion. It never stops working and thinking for us, but we rarely return the favor and think about the health of our brain. A healthy brain can concentrate, analyze, plan, learn, remember, feel, and so much more.

    While a healthy lifestyle supports a healthy brain, a happy brain also stays engaged. Feed your brain by playing games, learning new things, and staying connected with friends and family.

    Health at Home Lifetime book by the American Institute for Preventive Medicine. www.HealthyLife.com. All rights reserved.

    © American Institute for Preventive Medicine

  • Boils

    Skin Conditions

    Boils are common, but usually minor, skin problems. Most often, they occur in areas where the skin becomes chaffed and where there are hair follicles. This includes the neck, buttocks, armpits, and genitals. A boil can range in size from that of a pea to a ping pong ball.

    Signs & Symptoms

    *  A round or cone-shaped lump or pimple that is red, tender, painful, or throbs.

    *  Pus may be visible under the skin’s surface after several days.

    *  The boil usually bursts open on its own after 10 to 14 days.

    Illustration of a boil.

    Causes

    Boils are caused when a hair follicle or oil gland becomes infected with staph bacteria. Boils can be very contagious. Risk factors that make them more likely to occur include:

    *  Poor hygiene.

    *  Overuse of corticosteroid medicine.

    *  Diabetes.

    *  Short, curly hair that has a tendency to grow back down into the skin.

    Treatment

    Self-care treats boils. If this is not enough, your doctor may need to lance and drain the boil and prescribe an antibiotic.

    Questions to Ask

    Self-Care / Prevention

    *  Don’t scratch, squeeze, or lance boils.

    *  Put a hot water bottle over a damp washcloth and place it on the boil.

    *  Soak in a warm tub. Use an antibacterial soap. If boil is ready to burst open, take warm showers instead.

    *  Take an over-the-counter medicine for pain and swelling as directed.

    *  Wash your hands after contact with a boil. Keep clothing and other items that were in contact with the boil away from others.

    *  Once the boil begins to drain, keep it dry and clean. Loosely cover the boil with a sterile gauze dressing. Use first-aid tape to keep it in place. Replace the dressing if it gets moist.

    *  Wash bed linens, towels, and clothing in hot water. Do not share towels, sports equipment, etc.

    *  Don’t wear tight-fitting clothes over a boil.

    Healthier at Home book by the American Institute for Preventive Medicine. www.HealthyLife.com. All rights reserved.

    © American Institute for Preventive Medicine

  • Cpr

    First Aid

    Conventional CPR ─ Chest Compressions and Rescue Breaths {Note: Doing Hands-Only CPR is advised for persons not trained in CPR. Take a training course in CPR to learn how to do it the right way. Find out about training course in CPR to learn how to do it the right way. Find out about training atwww.cpr.heart.org.} Do CPR when the person is not responsive, is not breathing, and does not have a pulse.

    Hands Only CPR

    This is giving chest compressions with no rescue breaths. It can be used for adults and teens who suddenly collapse.

    Hands-Only CPR is not for:

    *  All infants and children.

    *  Adults and teens who have collapsed due to near-drowning, a drug overdose, or breathing problems.

    *  Adults and teens who are already unconscious and not breathing normally when found.

    Hands-Only CPR – 2 Steps:

    1.  Call 9-1-1 or get someone else to call!

    2.  Push hard and push fast in the center of the chest. Give 100 compressions per minute, such as to the tune of “Staying Alive” by the Bee Gees. Keep this up until an automated external defibrillator (AED) is used or EMS arrives.

    See the Hands-Only™ CPR video atwww.cpr.heart.org.

    CPR for Adults & Teens

    Shout for help! Call or have someone else call 9-1-1 and get an automated external defibrillator (AED) if one is nearby. If another person is around, one of you stay with the person. The other one call 9-1-1 and get the AED. Follow the 9-1-1 dispatcher’s advice. Do CPR until the AED is used or EMS takes over.

    1. Begin Chest Compressions:

    *  Kneel at the person’s side. Place the heel of one hand ½ inch above where the ribs join the breastbone. Place your other hand on top of this one. Using the heels of your hands, depress the middle of the chest between the nipples at least  2 inches, but not more than 2.4 inches deep. Keep your arms straight. See image A.

    *  Push hard and push fast! Give at least 100 chest compressions in one minute. Relax pressure completely after each compression.

    Image of chest compressions.

    Image A

    2. Open the person’s airway.

    With one hand, tilt the person’s head back. With 2 fingers of your other hand, lift the chin up. See image B. If the airway is blocked,  tilt the person’s head gently and slowly until the airway is open.

    Image of opening a person's airway.

    Image B

    3. If the person is breathing, keep the airway open.

    Look for other problems.

    4. If the person is not breathing, take a normal, (not deep) breath, and give him or her “Rescue Breaths.”

    *  Pinch the nose shut. Forming a tight seal, place your mouth over the person’s open mouth. See image C.

    *  Give 1 full breath for 1 second. If the chest doesn’t rise, repeat head tilt chin lift. See image B. Give the 2nd full breath for 1 second. Look to see if the person’s chest rises.

    Image of Rescue Breaths.

    Image C

    5. Give cycles of 30 chest compressions and 2 rescue breaths, without a break, until the person starts to move, an AED is used, or EMS provides care.

    Children Ages 1 to Puberty

    Shout for help! If you are alone, do CPR for 2 minutes before you call 9-1-1. If the child does not appear to have a serious injury, carry the child to nearest phone and call 9-1-1! Put the phone on speaker mode. Follow the dispatcher’s advice. If you are not alone, someone start CPR; someone else call 9-1-1 and get an AED, if one is nearby.

    1. Place the child on his or her back.

    2. Start Chest Compressions:

    *  Put one hand on the child’s breastbone right between his or her nipples.

    *  Using the heel of your hand (or both hands like in image A under Adults & Children Who Reached Puberty) push straight down about 2 inches (at least one-third of the depth of the child’s chest). See image D. Let the chest rise back up after each push.

    *  Push hard and push fast! Give at least 100 chest compressions in one minute. Relax pressure completely after each compression.

    Image of child chest compressions.

    Image D

    3. Follow steps 2, 3, 4, and 5 under CPR For Adults and Children who Have Reached Puberty on this page.

    {Note: Chest compressions alone are better than doing nothing, but it is best to give chest compressions plus rescue breaths. Why? Airway problems are the main cause of cardiac arrest in infants and children.}

    Babies Up to 1 Year Old

    1. If you are alone, do CPR for 2 minutes before you call 9-1-1.

    If the child does not appear to have a serious injury, carry the child to nearest cell or other phone and call 9-1-1!  Put the phone on speaker mode. Follow the dispatcher’s advice. If you are not alone, someone start CPR; someone else call 9-1-1!

    2. Start Chest Compressions:

    *  Put the tips of your middle and ring fingers on the baby’s breastbone right between his or her nipples. See image E.

    *  Slip your other hand underneath the baby’s back for support.

    *  Push straight down about 1½ inches (at least one-third of the depth of the baby’s chest). Push at a rate of at least 100 compressions per minute. Let the chest rise back up after each push.

    Illustration of baby chest compressions.

    Image E

    3. If the baby is not breathing, or you are not sure he or she is breathing, give Rescue Breaths:

    *  Cover the infant’s mouth and nose with your mouth, forming a tight seal.

    *  Give 1 full breath for 1 second. Look to see if the chest rises. Give the 2nd full breath for 1 second and look to see if the chest rises.

    *  If the chest does not rise, go back to giving chest compressions. See step 2 listed above. After 30 more compressions, try rescue breaths again. {Note: If you can’t give rescue breaths, just keep giving chest compressions.}

    4. Give cycles of 30 chest compressions and 2 rescue breaths, without a break.

    Do this until the baby starts to move or until EMS provides care.

    Healthier at Home book by the American Institute for Preventive Medicine. www.HealthyLife.com. All rights reserved.

    © American Institute for Preventive Medicine

  • Electric Shock

    First Aid

    Electric shock occurs when an electric current flows through the body. The human body is made up of 60% to 70% water. This makes it a good conductor of electricity. Burns, damage to internal organs, heart rhythm problems, and death, can result from electric shock.

    Signs & Symptoms

    *  Shocking sensations. Numbness or tingling. A change in vision, speech, or in any sensation.

    *  Burns or open wounds. These occur where the electricity enters and exits the body.

    *  Muscle spasms or contractions.

    *  Sudden immobility or fractures. A body part may look deformed.

    *  Interrupted breathing. Irregular heartbeats or chest pain.

    *  Seizures.

    *  Unconsciousness.

    A small child who bites or sucks on an electric cord can have a facial injury or distinct burn around the rim of the mouth.

    Causes

    *  Touching a high-voltage (more than 1,000 volts) source, such as high-tension wires that fall during a storm. Touching someone who is still touching a live current. Touching a low-voltage (less than 1,000 volts) current source, such as an electric socket or worn cord.

    *  Mixing water and electricity.

    *  Being struck by lightning. A bolt of lightning carries as many as 30 million volts.

    Treatment

    Contact with electricity from a high-voltage wire or being struck by lightning needs emergency medical care. Contact with electricity from a low-voltage current needs emergency medical care if any signs or symptoms are present. A person who does not have any symptoms should still see a doctor to check for possible internal injuries.

    To Avoid Being Harmed by Lightning

    *  Heed weather warnings.

    *  Take shelter in a building, if you can.

    *  Stay in your car (if it is not a convertible) rather than out in the open.

    *  If you are caught outside, avoid tall trees, open water, metal objects, and high ground. Crawl into a low-lying place or curl up on the ground, head to knees with your head touching the ground.

    Questions to Ask

    Self-Care / First Aid

    Beware! Do not put yourself in danger to give first aid. Do not touch the person until power is shut off.

    *  If the source is a high-voltage wire or lightning, call 9-1-1!

    *  It is safe to touch a person struck by lightning.

    *  If the source is a low-voltage current, remove the fuse or switch off the circuit breaker to the electrical outlet.

    *  If you can’t shut off the source, with dry feet and hands, use a board, wooden stick, rope, etc. to get the person away from the source.

    *  If it is safe for you to touch the person, check for a response. Give CPR, as needed.

    *  Unless it is absolutely necessary, don’t move the person. He or she could have a traumatic injury, especially to the head or neck.

    *  Check for burns. Cover burned areas with dry, sterile dressings.

    *  Give first aid for Shock, if needed.

    Prevention

    *  Stay clear of fallen wires. Inform the police, electric company, etc.

    *  Install ground-fault circuit-interrupters (GFCIs) in wall outlets of bathrooms, kitchens, etc. With GFCIs, when an electrical appliance falls into water, the current is instantly cut off.

    *  Don’t turn electrical switches on or off or touch an electric appliance while your hands are wet, while standing in water, or when sitting in a bathtub.

    *  Replace worn cords and wiring.

    *  Cover all electric sockets with plastic safety caps.

    *  Before you do electrical repairs, remove the fuse from the fuse box or switch off the circuit breaker. Don’t just turn off the appliance or light switch.

    Healthier at Home book by the American Institute for Preventive Medicine. www.HealthyLife.com. All rights reserved.

    © American Institute for Preventive Medicine

  • Floaters & Flashes

    Eye Conditions

    Signs & Symptoms

    *  Floaters are specks, dots, cobwebs, or wavy lines that seem to fall within the line of sight. They rarely affect eyesight. They are more visible against a plain or dark background.

    *  Flashes are streaks of light that “flash” across the field of vision. They can occur when the eyes are closed or in extreme darkness.

    Causes

    With aging, the middle portion of the eye, called the vitreous, becomes less solid and more liquid. This allows particles (floaters), which have always been in the eye, to begin to move around. Flashes can occur when the vitreous shrinks and pulls on the retina of the eye. This is common. On rare occasions, when the vitreous detaches from the retina, it can rip or tear the retina. This may lead to a detached retina. The retina peels away from the eye wall causing sight loss.

    Risk Factors for Floaters and Flashes

    *  Eye diseases or injuries.

    *  A tear in the retina. Aging and cataract surgery increase the risk for this.

    *  High blood pressure.

    *  Migraine headaches.

    *  Nearsightedness.

    Treatment

    Self-care is enough to treat floaters and flashes unless they are due to another medical condition.

    Questions to Ask

    Self-Care / Prevention

    *  Move your eyes up and down (not side to side) several times.

    *  Don’t focus on or stare at plain, light backgrounds, such as a blank pastel wall or the light blue sky.

    *  You may notice flashes less if you avoid moving suddenly, don’t bend over, and don’t get up quickly from sitting or lying down.

    Healthier at Home book by the American Institute for Preventive Medicine. www.HealthyLife.com. All rights reserved.

    © American Institute for Preventive Medicine

  • Heart Palpitations

    Heart & Circulation Problems

    Signs & Symptoms

    Palpitations can be felt in the chest, throat, or neck. With them, it feels like the heart is pounding, racing, and/or fluttering. It can feel like the heart has skipped a beat.

    Causes

    Most of the time, palpitations are not a serious problem. Common causes include:

    *  Anxiety. Fear. Stress. Hyperventilation.

    *  Caffeine. Diet pills. Nicotine. Drugs.

    *  Exercise.

    *  Medicines. Examples are beta-blockers, some asthma and cold medicines, and thyroid pills.

    Other causes are:

    *  An arrhythmia (heart rate or rhythm disorder).

    *  Mitral valve prolapse (MVP). This is a heart valve problem. It may be treated with medicine. It is not usually a serious condition.

    *  Anemia.

    *  Hyperthyroidism.

    *  Low blood sugar.

    Treatment

    Treatment depends on the cause.

    Questions to Ask

    Self-Care / Prevention

    *  If palpitations occur with exercise, stop the activity. Rest. When you exercise again, gradually increase how long and how intense you do the activity.

    *  To relieve stress and anxiety, do relaxation exercises.

    *  Limit or avoid caffeine, nicotine, and alcohol.

    *  Don’t take cold/allergy medicines. Don’t take appetite suppressants.

    *  Call your doctor if rest doesn’t help or if palpitations occur again and again.

    Resources

    The American Heart Association

    800.AHA.USA1 (242.8721)

    www.heart.org/HEARTORG

    National Heart, Lung, and Blood Institute (NHLBI)

    www.nhlbi.nih.gov

    Healthier at Home book by the American Institute for Preventive Medicine. www.HealthyLife.com. All rights reserved.

    © American Institute for Preventive Medicine

  • Eye Irritations & Injuries

    Eye Conditions

    As you age, your eyes can get irritated more easily because they make less tears. Poorer vision increases the risk for eye injuries.

    Signs & Symptoms

    You feel burning, dryness, itching, and/or pain and swelling in one or both eyes.

    Causes

    For Eye Irritation:

    Causes include particles in the eye; too much sun exposure, low humidity; strong wind; and scratches from contact lenses. Other causes are allergies, infections, and conditions that make your eyes dry.

    For Eye Injuries:

    Causes include a physical blow to the eye; harsh chemicals; and a foreign body that is stuck in the eye.

    Mild eye irritations and injuries can be treated with self-care. More serious problems need medical care.

    Treatment

    *  Wear safety glasses for activities that expose your eyes to sawdust, etc.

    *  When using harsh chemicals, wear rubber gloves and protective glasses. Don’t rub your eyes if you’ve touched harsh chemicals. Turn your head away from chemical vapors.

    *  To help prevent dry eyes, use a humidifier and limit exposure to smoke, dust, and wind. Avoid alcohol.

    *  Use artificial tear drops with your doctor’s okay.

    *  Don’t stare directly at the sun, especially during a solar eclipse.

    *  Wear sunglasses that block UV rays.

    *  Don’t use eye makeup when an allergy or chemical irritant bothers your eye(s).

    Self-Care / Prevention

    To Ease the Discomfort of Dry Eyes:

    With your doctor’s okay, use over-the-counter artificial tear drops, such as Ocu-Lube. Read the label. Refrigerate the solution, if needed. Wash your hands before using.

    To Treat an Insect Bite Without a Severe Allergic Reaction:

    *  Wash the eye(s) with warm water.

    *  Take an antihistamine if okay with your doctor.

    To Remove a Foreign Particle On the White of the Eye or Inside the Eyelids:

    *  Do not remove an object imbedded in the eye, a metal chip, or a foreign body over the colored part of the eye. (See “First Aid for Foreign Body Sticking Into the Eye” on this page.)

    *  Wash your hands.

    *  If the foreign object is under the upper lid, have the person look down and pull the upper lid away from the eyeball by gently grabbing the eyelashes. Press a cotton-tipped swab down on the skin surface of the upper eyelid and pull it up and toward the brow. The upper lid will invert. Touch and remove the debris with the tip of the tissue.

    *  Twist a piece of tissue, moisten the tip with tap water (not saliva) and gently try to touch the speck with the tip. Carefully pass the tissue over the speck, which should cling to the tip.

    *  Do not rub the eye or use tweezers or anything sharp to remove a foreign object.

    *  Gently wash the eye with cool water.

    To Treat a Bruise from a Minor Injury that Surrounds the Eye but Does Not Damage the Eye Itself:

    *  Put a cold compress over the injured area right away. Keep doing this for 15 minutes, every hour, for 48 hours.

    *  Take an over-the-counter medicine

    *  After 48 hours, put a warm compress over the injured area.

    *  Seek medical attention if these measures do not help.

    First Aid for Foreign Body Sticking Into the Eye Before Immediate Care:

    *  Do not remove the object.

    *  Don’t press on, touch, or rub the eye.

    *  Cover the injured eye with a paper cup or other clean object that will not touch the eye or the foreign object. Hold the paper cup in place with tape without putting pressure on the eye or the foreign object.

    *  Gently cover the uninjured eye with a clean bandage and tape, too, to keep the injured eye still.

    First Aid for Harmful Chemicals in the Eye(s) Before Immediate Care:

    *  Flush the eye(s) with water immediately!

    *  Hold the injured eye open with your thumb and forefinger.

    *  At the faucet or with a pitcher or other clean container, flush the eye with a lot of water. Start at the inside corner and pour downward to the outside corner. This lets the water drain away from the body and keeps it from getting in the other eye.

    *  Keep pouring the water for 10 to 30 or more minutes. Flush the eye with water until you get medical help.

    *  If both eyes are injured, pour water over both eyes at the same time or quickly alternate the above procedure from one eye to another. Or, place the victim’s face in a sink or container filled with water. Tell the victim to move his or her eyelids up and down and remove the face from the water at intervals in order to breathe. Use this method on yourself if you are the victim and are alone.

    *  Loosely bandage the eye with sterile cloth and tape. Don’t touch the eye.

    When to Seek Medical Care

    Contact Doctor When:

    You have any of these problems:

    *  Eye pain with eye irritation

    *  An eye that is red and/or swollen

    *  Yellow-green pus is under the eyelid or drains from the eye.

    Get Immediate Care When:

    *  Harmful chemicals have gotten into the eye(s). {Note: Before you get immediate care, give “First Aid for Harmful Chemicals in the Eye(s) Before Immediate Care” on this page.}

    *  A foreign body sticks into the eye. {Note: See “First Aid for Foreign Body Sticking Into the Eye Before Immediate Care” on this page.}

    *  A cut to the eye or eyelid occurs.

    *  Any of these problems occurs with a blow to the eye or other eye injury:

    – Loss of vision

    – Blurred or double vision

    – Blood in the pupil

    Healthier at Home book by the American Institute for Preventive Medicine. www.HealthyLife.com. All rights reserved.

    © American Institute for Preventive Medicine

  • Poison Ivy, Oak & Sumac

    Skin Conditions

    Poison ivy, oak, and sumac are the most common plants that cause a skin rash. A sap that comes from these plants causes the rash. The sap is not really a poison, but can cause an allergic reaction in some people.

    Image of posion ivy leaf.
    Image of poison oak leaf.
    Image of poison sumac.

    Signs & Symptoms

    The skin rash comes a day or two after contact with the plant. Symptoms that follow can range from mild to severe.

    *  Itching.

    *  Redness.

    *  Burning feeling.

    *  Swelling.

    *  Blisters.

    Causes

    You can get poison ivy, oak, or sumac when you touch one of these plants or touch pets, clothes, shoes, etc. that have the sap on them. Contact with the smoke of these burning plants can also cause a rash.

    Treatment

    Self-care treats most cases of poison ivy, oak, and sumac. For severe cases, your doctor may prescribe medicine(s).

    Questions to Ask

    Self-Care / Prevention

    To Prevent Getting a Rash

    *  Know what these plants look like and avoid them.

    – Poison ivy and poison oak both have 3 leaflets per stem. This is why you may have heard the saying, “Leaflets three, let them be.”

    – Each branch of poison sumac has 7 to 13 leaflets on a reddish stem. A single leaf is on the end of the stem. The others are paired along each side of the stem. Poison sumac grows in wetlands.

    *  Use an over-the-counter lotion (IvyBlock), which blocks skin contact with the sap. Use it as directed.

    *  Wear pants and long-sleeved shirts.

    *  Use an over-the-counter product (e.g., Tecnu) that removes poison ivy sap.

    *  Rinse the affected area with water.

    *  To help prevent an allergic reaction, do the things listed below. Do them within 6 hours of contact with one of the plants.

    – Remove all clothes and shoes that have touched the plant.

    – Wash the skin area well with soap and water.

    – Use an over-the-counter product (e.g., Tecnu) that removes poison ivy sap.

    To Treat Poison Ivy, Oak, or Sumac

    *  Take a cold shower, put the rash area in cold water, or pour cold water over it. Use soap when you shower.

    *  To relieve itching, take an over-the-counter antihistamine, such as Benadryl. Follow the label’s directions.

    *  For weeping blisters, mix 2 teaspoons of baking soda in 4 cups of water. Dip squares of gauze in this mixture. Cover the blisters with wet gauze for 10 minutes, 4 times a day. Do not apply this to the eyes.

    *  Wash all clothes and shoes with hot water and a strong soap. Bathe pets that have come in contact with the plant. The sap can stay on pets for many days. Clean items used to wash clothing and pets. Wear rubber gloves when you do all these things.

    *  Keep your hands away from your eyes, mouth, and face.

    *  Do not scratch or rub the rash.

    *  Take baths with lukewarm water. Add an over- the-counter product called Aveeno colloidal oatmeal.

    *  Apply any of these to the skin rash:

    – Calamine (not Caladryl) lotion.

    – Over-the-counter hydrocortisone cream. Follow the directions on the label.

    – A paste of 3 teaspoons of baking soda and 1 teaspoon of water.

    Healthier at Home book by the American Institute for Preventive Medicine. www.HealthyLife.com. All rights reserved.

    © American Institute for Preventive Medicine

  • Skin Cancer

    Skin Conditions

    Skin cancer is the most common kind of cancer in the U.S. When found early, skin cancer can be treated with success.

    Skin Cancer Warning Signs

    Contact your doctor if you notice any of these following signs:

    For basal cell and squamous cell skin cancers (types that seldom spread to other parts of the body):

    Small, smooth, shiny, pale, or waxy lump

    Firm red lump

    A lump that bleeds or develops a crust

    A flat, red spot that is rough, dry, or scaly

    For melanoma (can spread to other parts of the body and be fatal if not treated early). Look for any of these signs in an existing mole:

    A. Asymmetry – The shape of one half does not match the other.

    B. Border – The edges are ragged, notched or blurred.

    C. Color – The color is uneven.

    D. Diameter – The size changes and is often bigger than a pencil eraser.

    E. Evolving lesion – This is one that changes size, shape, shades of color or symptoms or has surface bleeding.

    Causes

    *  Recurrent exposure to ultraviolet (UV) radiation from the sun is the main cause.

    *  Artificial sources of UV radiation, such as sun lamps and tanning beds.

    Risk Factors

    *  Having skin cancer in the past.

    *  A family history of skin cancer.

    *  Having fair skin that freckles easily, especially with red or blond hair and blue or light-colored eyes.

    Treatment

    Depending on the size, type, and stage of the cancer, treatment includes:

    *  Surgery. There are many types.

    *  Chemotherapy. One form is a cream or lotion with anticancer drugs that is applied to the skin. Other forms are given through an IV.

    *  Radiation therapy. n Interferon drugs.

    *  Skin grafting.

    Questions to Ask

    Self-Care / Prevention

    Start prevention in childhood to protect against skin cancer later in life.

    *  Limit time in the sun, especially between 10 a.m. and 4 p.m.

    *  Use a broad-spectrum sunscreen with a sun protection factor (SPF) of 15 or higher as directed.

    *  Reapply sunscreen at least every 2 hours, more often if you’re sweating or going in and out of the water.

    *  Cover skin exposed to the sun, such as long-sleeved tops, pants, sunglasses, and wide-brimmed hats.

    *  Avoid sun lamps and tanning beds.

    Skin Self-Exam

    *  Do a skin self-exam monthly. The best time to do this is after a shower or bath. To check your skin, use a well- lit room, a full-length mirror, and a hand-held mirror.

    *  Locate your birthmarks, moles, and blemishes. Know what they look like. Check for a sore that does not heal.

    *  Check all areas.

    1.  Look at the front and back of your body in the mirror. Then, raise your arms and look at the left and right sides.

    2.  Bend your elbows and look carefully at the palms of your hands. Make sure to look at both sides of your forearms and upper arms.

    3. Look at the back and front of the legs. Look between the buttocks and around the genital area.

    4.  Look at your face, neck, and scalp. Use a comb or blow dryer to move hair so that you can see the scalp better.

    5.  Sit and closely examine the feet. Look at the soles and the spaces between the toes.

    {Note: Get a skin exam from your doctor or health care provider as often as advised.}

    Resources

    National Cancer Institute

    800.4.CANCER (422.6237)

    www.cancer.gov

    Healthier at Home book by the American Institute for Preventive Medicine. www.HealthyLife.com. All rights reserved.

    © American Institute for Preventive Medicine

  • Toothaches

    Dental & Mouth Concerns

    Signs & Symptoms

    *  Pain in or around a tooth that throbs or occurs with a fever and/or general ill feeling. Tooth pain occurs after you eat or drink or have something hot, cold, or sweet.

    *  Gums are red, swollen, and/or bleed.

    *  Earache and/or swollen glands on one side of the face or neck.

    Causes

    *  A food particle, such as a popcorn hull, gets stuck between the gum and a tooth.

    *  Tooth grinding (bruxism). This can wear down teeth and cause cracks in them.

    *  A cavity or infection is beneath or around the gum of a tooth.

    *  Tooth abscess. This is swelling and/or infection in the bone and/or the tooth’s canals.

    *  Gum (periodontal) disease.

    *  Impacted teeth. Teeth may not fully erupt or can grow at odd angles.

    *  Temporary pain from recent dental work.

    *  TMJ.

    *  An injury to a tooth.

    *  A symptom of a sinus infection.

    *  A symptom of angina and a heart attack.

    Treatment

    Emergency care is needed for a heart attack. A dentist or doctor can diagnose and prescribe proper treatment for other problems.

    Questions to Ask

    Self-Care / Prevention

    To Treat Tooth Pain Until You See the Dentist

    *  Gargle with warm salt water every hour. Hold an ice pack on the jaw. Don’t drink hot or cold liquids. Avoid sweets, soft drinks, and hot or spicy foods. It may be best not to eat at all until you see your dentist.

    *  Gently floss around the tooth to remove food particles that could be between the teeth.

    *  Take an over-the-counter pain reliever. Don’t place a crushed aspirin on the tooth, though. Aspirin burns the gums and destroys tooth enamel.

    *  For a cavity, pack it with a piece of sterile cotton soaked in oil of cloves. You can get this at a drug store.

    Healthier at Home book by the American Institute for Preventive Medicine. www.HealthyLife.com. All rights reserved.

    © American Institute for Preventive Medicine